
How to Install Theme in WordPress (Three Methods) | Are you looking for a guide on how to install a theme in WordPress? If you are new to WordPress, you may find the process confusing at first. Even experienced WordPress users can occasionally encounter problems when installing a new theme directly from the dashboard, particularly when the theme file is too large or the hosting server has certain restrictions.
A WordPress theme determines the overall appearance and layout of your website. It controls various design elements, such as colours, typography, page layouts, headers, footers and other visual components. Choosing the right theme can help you create a professional-looking website that provides a better experience for your visitors.
In this tutorial, I will explain three methods for installing a WordPress theme. You can install a theme directly from the WordPress dashboard, upload it through cPanel or use an FTP client to transfer the theme files to your web server.
Each method has its own advantages, so you can choose the one that best suits your needs and technical experience.
Table of Contents
How to Install Theme in WordPress (Three Methods)

How to Install a Theme in WordPress
Before installing a new theme, I recommend reading our guide to the best SEO themes for WordPress. Choosing a suitable theme can help you create a website that matches your requirements and provides the features you need.
You should also make sure that the theme is compatible with your WordPress version and comes from a trusted source. If you are changing the theme of an existing website, consider creating a backup first so you can restore your website if something goes wrong.
Method 1: Install a WordPress Theme Directly from the Dashboard
Installing a theme through the WordPress dashboard is the easiest method for beginners. You do not need to access your hosting control panel or use an FTP client. You can install a free theme from the official WordPress Theme Directory or upload a theme that you have downloaded to your computer.
Follow these steps to install your theme.
Step 1: Log in to Your WordPress Dashboard
First, log in to your WordPress administration area. In most installations, you can access it by visiting yourdomain.com/wp-admin, replacing yourdomain.com with your website's domain name.
Enter your username and password to access the dashboard. Once logged in, you will see the administration menu on the left side of the screen.
Step 2: Navigate to Appearance > Themes
From the dashboard menu, navigate to Appearance > Themes.
This page displays the themes currently installed on your WordPress website. You can view your active theme and any additional themes that are available to activate.
Step 3: Click the Add New Theme Button
Click the Add New Theme or Add New button near the top of the page. The exact wording and layout may vary depending on your WordPress version.
WordPress will display a selection of themes that you can browse. You can search for a theme by name or explore the available options to find a design that suits your website.
Step 4: Search for a Theme or Upload Your Own
You have two options at this stage.
If you want to install a free theme from the official WordPress Theme Directory, use the search field to find a suitable option. You can also browse featured, popular and recently added themes.
Before choosing a theme, consider its design, available features, compatibility, update history and user reviews. Selecting a theme that suits your website's purpose can make customisation easier later.
Alternatively, if you have purchased or downloaded a theme from a third-party developer, click Upload Theme. This option allows you to upload the theme file directly from your computer.
Make sure that the theme is packaged in a supported ZIP archive before uploading it. If the developer provides a larger ZIP file containing documentation, plugins and multiple theme packages, you may need to extract that archive first and locate the actual installable theme ZIP file.

Step 5: Install the Theme
If you are installing a theme from the WordPress Theme Directory, click Install on the theme you want to use.
If you are uploading a theme from your computer, click Choose File, select the theme's ZIP file and click Install Now.
WordPress will upload the file, extract the theme and install it on your website. Wait until the installation process has finished before moving to the next step.
If the installation fails, check the error message. Common causes include an incorrect ZIP file, insufficient server resources, file permission problems or an upload size limit imposed by your hosting provider.
Step 6: Activate the Theme
After the theme has been installed successfully, click Activate.
Installation and activation are two different processes. Installing a theme adds its files to your website, while activating it makes the theme the current design used by your WordPress site.
Once activated, visit your website to see how the new theme looks. You may need to customise the layout, menus, colours, fonts, widgets or other settings before the website looks the way you want.
Some themes also include an onboarding process or require additional configuration. Follow the theme developer's instructions to complete the setup.

Method 2: Install a WordPress Theme Through cPanel
The second method is to install a theme through cPanel. This approach is useful if you cannot upload the theme through the WordPress dashboard because of an upload size restriction or another installation problem.
However, this method requires access to your hosting account and its File Manager. The steps may differ slightly depending on your hosting provider and the version of cPanel available.
Step 1: Log in to Your Hosting cPanel
First, log in to your hosting account and open cPanel. Your hosting provider should provide the login details and instructions for accessing this control panel.
Once you have logged in, look for File Manager. This tool allows you to manage files and folders stored on your web server without using an FTP client.
Step 2: Navigate to the WordPress Themes Directory
In File Manager, locate the directory where WordPress is installed.
For a typical installation in the main website directory, the path is: public_html/wp-content/themes/
If WordPress is installed in a subdirectory, the path may look like this: public_html/wordpress/wp-content/themes/
The exact directory depends on your website's configuration. Make sure you access the correct WordPress installation before uploading any files.
The themes folder contains the themes installed on your website. Each theme normally has its own folder within this directory.
Step 3: Upload the Theme ZIP File
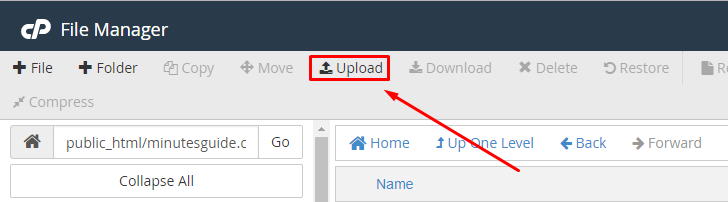
Once you have opened the themes directory, click Upload in File Manager.
Select the ZIP file containing your WordPress theme from your computer and wait for the upload to finish. Uploading the theme as a ZIP file is generally more convenient than uploading numerous individual files.
Keep in mind that the ZIP archive must contain the actual theme files. If you downloaded a package containing several files, check the developer's documentation to identify the correct theme archive.
Step 4: Extract the ZIP File
After the upload is complete, return to File Manager and locate the uploaded ZIP file.
Select the file and choose Extract. Follow the prompts to extract the archive into the themes directory.
Once extraction is complete, check that the theme files are arranged correctly. The theme's main folder should contain its required files and directories rather than another nested folder containing the actual theme.
For example, a typical theme folder might look like this: wp-content/themes/example-theme/
The folder name in this example is illustrative. Your actual theme will use its own directory name.
If the files are extracted into an unexpected nested folder, WordPress may not recognise the theme. Correct the folder structure before proceeding.
Step 5: Open the WordPress Dashboard
After extracting the theme files, return to your WordPress dashboard.
Navigate to Appearance > Themes. The theme you uploaded should now appear among the installed themes, provided that its files are valid and arranged correctly.
If the theme does not appear, double-check the directory location and folder structure. Also confirm that the uploaded package contains a complete WordPress theme.
Step 6: Activate the Theme
Find the newly installed theme and click Activate.
Your website will now use the selected theme. Visit the front end of your website to check whether the design displays correctly.
You may need to configure the theme's settings, create or assign navigation menus, adjust the homepage layout and customise other design elements. These options depend on the theme you have installed.
If the website displays incorrectly after activation, consider switching back to your previous theme while investigating the problem.
Method 3: Install a WordPress Theme Through FTP
The third method is to install a WordPress theme using FTP. This method is particularly useful when you prefer to manage website files directly or when the WordPress dashboard cannot upload the theme.
FTP stands for File Transfer Protocol. It allows you to transfer files between your computer and your web server using an FTP client.
For a more secure connection, use SFTP (SSH File Transfer Protocol) if your hosting provider supports it. You will need the connection details supplied by your hosting provider, such as the server address, username, password or SSH key, and port.
If you are unfamiliar with FTP, read our FTP guide before proceeding.
Step 1: Connect to Your Web Server
First, open your preferred FTP client and enter your hosting connection details.
Connect to your server and locate the directory where WordPress is installed. If you are using SFTP, make sure that your connection settings match those provided by your hosting company.
Once connected, you should be able to view the files and folders on your web server.
Step 2: Navigate to the Themes Directory
Find the WordPress installation directory and open: wp-content/themes/
This is the directory where WordPress stores its installed themes.
Before uploading files, confirm that you are working in the correct directory. Uploading a theme to the wrong location may prevent WordPress from recognising it.
Step 3: Extract the Theme ZIP File on Your Computer
Before transferring the theme through FTP, download the theme ZIP file and extract it on your computer.
You should now have a theme folder containing the required files and subdirectories. Keep the folder structure intact because WordPress needs the theme files to remain in their correct locations.
Do not upload only the ZIP archive into the themes directory and expect WordPress to install it automatically. When using this method, you generally need to upload the extracted theme folder.
Step 4: Upload the Theme Folder
In your FTP client, locate the extracted theme folder on your computer.
Upload the entire folder to the server's wp-content/themes/ directory. Wait until all files have been transferred successfully.
The resulting directory should look similar to this: wp-content/themes/example-theme/
The example-theme folder is only an example. Your theme will have its own folder name.
If the transfer is interrupted or some files fail to upload, reconnect to the server and verify that the theme folder contains all the required files. An incomplete upload may prevent the theme from appearing or functioning correctly.
Step 5: Open Appearance > Themes in WordPress
After uploading the theme folder, log in to your WordPress dashboard.
Navigate to Appearance > Themes. WordPress should detect the theme if it has been uploaded to the correct directory and contains valid theme files.
If the theme is missing, check the directory path, folder structure and file permissions. You should also confirm that you uploaded the extracted theme folder rather than an outer package containing unrelated files.
Step 6: Activate the Theme
Once the theme appears in the installed themes list, click Activate.
Visit your website to check the new design. If necessary, customise the theme settings and adjust the layout to suit your website's requirements.
If you encounter an error or notice that parts of the website are missing, deactivate the new theme or switch back to your previous theme while troubleshooting.
Conclusion
In this tutorial, you have learned three methods for installing a WordPress theme: directly through the WordPress dashboard, through cPanel and through FTP.
For beginners, installing a theme through the WordPress dashboard is usually the easiest option because WordPress handles the upload and extraction process for you. If the dashboard method fails because of an upload restriction or another technical issue, cPanel and FTP provide alternative ways to transfer the theme files to your web server.
Whichever method you choose, make sure that you download the theme from a trusted source, upload the correct files and activate the theme after installation. You should also review the theme settings and check your website after activation to ensure that everything displays correctly.
With the right theme and configuration, you can customise your WordPress website to match your needs and provide a better experience for your visitors.
Conclusion
How do I install a theme in WordPress?
You can install a WordPress theme through the WordPress dashboard by navigating to Appearance > Themes > Add New Theme. Search for a theme from the official WordPress Theme Directory, click Install and then click Activate. If you have downloaded a theme from another source, select Upload Theme and upload the theme's ZIP file.
Can I install a WordPress theme without using the dashboard?
Yes. You can install a WordPress theme without using the dashboard by uploading its files through cPanel File Manager or an FTP client. With cPanel, upload the theme ZIP file to the wp-content/themes/ directory and extract it. With FTP, extract the ZIP file on your computer first and upload the complete theme folder to the same directory. Afterward, activate the theme through Appearance > Themes.
How do I upload a premium WordPress theme?
To upload a premium WordPress theme, download the installation ZIP file from the theme developer or marketplace. Log in to your WordPress dashboard, navigate to Appearance > Themes > Add New Theme and click Upload Theme. Select the correct ZIP file, click Install Now and activate the theme after installation. If the downloaded package contains multiple files, extract it first and locate the actual theme ZIP file.
Why can't I install a WordPress theme?
You may be unable to install a WordPress theme because of an incorrect ZIP file, a server upload size limit, insufficient hosting resources, file permission problems or compatibility issues. Check the error message displayed by WordPress to identify the cause. If the problem involves the upload limit, contact your hosting provider or use cPanel or FTP to transfer the theme files.
What is the difference between installing and activating a WordPress theme?
Installing a WordPress theme adds its files to your website, making it available for use. Activating a theme makes it the current theme that controls your website's appearance. You can install multiple themes on a WordPress website, but only one standard theme can be active at a time for a particular site.
Will installing a new WordPress theme delete my existing posts and pages?
Installing a new WordPress theme normally does not delete your existing posts, pages, media files or other database content. However, changing themes may affect your website's layout, menus, widgets, homepage appearance and theme-specific features. Some customisation settings may also be lost or need to be configured again. It is advisable to back up your website before making major changes.
How do I install a WordPress theme using cPanel?
Log in to your hosting cPanel and open File Manager. Navigate to the WordPress installation directory, then open wp-content/themes/. Upload the theme ZIP file and extract it into that directory. Make sure the theme files are arranged in the correct folder structure. Finally, return to your WordPress dashboard, open Appearance > Themes and activate the newly installed theme.
How do I install a WordPress theme using FTP?
Connect to your web server using an FTP client or SFTP client with your hosting credentials. Navigate to wp-content/themes/, extract the theme ZIP file on your computer and upload the complete theme folder. After the transfer is complete, log in to WordPress, navigate to Appearance > Themes and activate the theme.
Can I change my WordPress theme without losing my website content?
Yes. You can generally change your WordPress theme without losing your posts, pages and uploaded media. However, elements that depend on the old theme, such as custom widgets, shortcodes, page templates and theme-specific settings, may stop working or appear differently. Preview and test the new theme carefully, and create a backup before switching.
Where can I find free WordPress themes?
You can find free WordPress themes in the official WordPress Theme Directory at WordPress.org Themes. You can also browse themes directly from your WordPress dashboard under Appearance > Themes > Add New Theme. Choose themes from trusted developers and review their compatibility, update history and available features before installing them.
References
- How to install a WordPress theme: 4 methods - hostinger.com
- How to Install a WordPress Theme (3 Easy Methods) - kinsta.com/blog