• Skip to primary navigation
  • Skip to main content
  • Skip to primary sidebar
  • Skip to footer
MinutesGuide.com

MinutesGuide.com

It is Not Just About WordPress

  • Home
  • About
  • Blog
    • Blogger Talk
    • Email Marketing
    • Hosting Talk
    • Plugins
    • Themes
      • Extra & Divi
    • WPbeginner
      • Guide
      • Life Hacks
      • WP Fix
    • WP Security
    • WP SEO
    • WooCommerce
  • Services
  • Reference
  • Contact
  • Start Here
You are here: Home / WooCommerce / How to Create a Link Direct to WooCommerce Checkout?

How to Create a Link Direct to WooCommerce Checkout?

Post on November 5, 2017 | Updated on March 10, 2022 by FaizAlias 30 Comments

How to Create a Link Direct to WooCommerce Checkout? Sometimes, you need to create a link direct to WooCommerce checkout for some reason. Maybe you want customers to more focus on what they are buying without going to the cart page.

This link also more effective if you use it on the sales page. You can put this link on the order button. When your prospect clicks on the order button, they will go directly to WooCommerce checkout for payment. This technique can increase your sales conversion and look more professional for using in sales pages.

Create a Link Direct to WooCommerce Checkout

Before we start, you must know this tutorial will not change the add to cart button. It just creates a link.
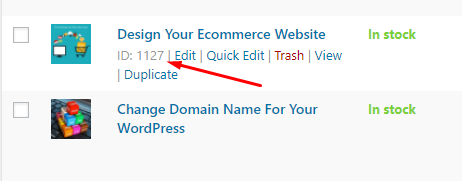
Step 1 Find product ID

To find product ID, navigate to Products >>> All Products. Find your product and then hover the mouse on the product. You will see ID of the product here.

link direct

Step 2 Create Link

This is link for direct to checkout page >>> www.yourdomain.com/checkout/?add-to-cart=ID

Change the orange highlight with your domain name and change the green highlight with your product’s ID.

For example, the full link you will get should be like this >>> www.yourdomain.com/checkout/?add-to-cart=1127

Step 3 Copy and Paste

After finish, copy overall URL and paste it on where you wish to put it.

That all.

So easy right?

Conclusion

In this article, you have learned how to create a link directly to checkout page in WooCommerce.

If you like this article, then please FOLLOW our Linkedin, Twitter, YouTube, Pinterest, and Facebook. Do not forget to check our services page to upgrade your WordPress. If you find this post has an issue with copyright, outdated, or in error, please contact us to fix it.

Related Article..

  • Unpaid Order Cancelled – Time Limit Reached
  • Change Text “Returning Customer?” Message on WooCommerce Checkout
  • How to Put Logo in WooCommerce Email Template
  • How to Remove Billing Address in WooCommerce (Easy Step)
  • How to Change Order Status Automatically in WooCommerce?

Filed Under: WooCommerce

Reader Interactions

Comments

  1. Miles says

    February 24, 2020 at 4:24 pm

    This was surprisingly super helpful and easy, thank you!!

    Reply
    • FaizAlias says

      May 18, 2020 at 7:16 am

      hi…thanks for comment… ๐Ÿ™‚

      Reply
  2. Chris says

    March 1, 2020 at 12:55 am

    Thanks! Went from “I wonder if it’s possible…” to having it done in about 5 minutes with this!

    Reply
    • FaizAlias says

      May 18, 2020 at 7:15 am

      thanks crist for comment… ๐Ÿ™‚

      Reply
  3. Michelle says

    March 26, 2020 at 10:38 pm

    This link takes me to the cart page, not the checkout page… is there a way to by-pass the cart and go straight to the checkout page?

    Reply
    • FaizAlias says

      May 18, 2020 at 7:13 am

      I try it and it still working…

      Reply
    • souhail says

      September 13, 2020 at 2:57 am

      You must firstly desactivate “Redirect to the cart page after successful addition” option in woocommerce settings-> product-> Add to cart behaviour

      Reply
      • FaizAlias says

        September 13, 2020 at 10:11 pm

        thanks for advice

        Reply
  4. David says

    April 19, 2020 at 5:11 pm

    This doesn’t work in 2020 anymore. It just goes to the /cart page.

    Reply
    • FaizAlias says

      May 18, 2020 at 7:08 am

      I try and it still working…

      Reply
    • James Hipkin says

      June 17, 2020 at 8:15 am

      I just used it and it worked fine for me. Such a simple and elegant solution.

      Reply
    • zsouhail says

      September 13, 2020 at 2:56 am

      You must firstly desactivate “Redirect to the cart page after successful addition” option in woocommerce settings-> product-> Add to cart behaviour

      Reply
      • FaizAlias says

        September 13, 2020 at 10:11 pm

        thanks for your info

        Reply
  5. Julia says

    June 3, 2020 at 2:20 am

    Thank you for sharing. this is what i need

    Reply
    • FaizAlias says

      August 15, 2020 at 6:33 pm

      welcome Julia ๐Ÿ™‚

      Reply
  6. Aimi says

    June 7, 2020 at 3:16 am

    THANK YOU, encik Faiz!
    Moga dibalas baik oleh Allah ๐Ÿ™‚

    Reply
    • FaizAlias says

      August 15, 2020 at 5:39 pm

      terima kasih… ๐Ÿ™‚

      Reply
  7. aneru says

    July 8, 2020 at 6:04 am

    thanks but is not working like i want

    Reply
    • FaizAlias says

      August 15, 2020 at 5:21 pm

      thank you….actually, what do you want to do?

      Reply
  8. Nor Rezwan Nordin says

    October 1, 2020 at 8:21 pm

    Not bad r bro….
    Semoga dimurahkan rezeki lagi pasni…
    dok mane tu? mne tau dok dekat2

    Reply
    • FaizAlias says

      October 3, 2020 at 4:43 pm

      haha…terima kasih komen bro…ada Kelantan

      Reply
  9. Joy says

    May 2, 2021 at 4:34 pm

    Wow thanks for this wonderful content,

    Reply
    • FaizAlias says

      May 28, 2021 at 8:45 am

      thanks… ๐Ÿ™‚

      Reply
  10. Ruth says

    June 7, 2021 at 7:52 am

    Thanks for this great content

    Reply
    • FaizAlias says

      June 10, 2021 at 12:17 am

      thanks following this tutorial ๐Ÿ™‚

      Reply
  11. Angel says

    August 4, 2021 at 5:53 pm

    Nice content

    Reply
    • FaizAlias says

      August 6, 2021 at 11:44 pm

      thanks ๐Ÿ™‚

      Reply

Leave a Reply Cancel reply

Your email address will not be published. Required fields are marked *

Primary Sidebar

Follow Me

  • Facebook
  • GitHub
  • LinkedIn
  • Pinterest
  • Twitter
  • YouTube

Start With…

Start Blogging
eShop Guide
WP Guide
WP Security

Categories

Footer

About MinutesGuide

Was founded in October 2017 by FaizAlias. The main goal of this site is to provide quality tips, tricks, hacks in easy way that you can learn it just in minutes.

Highlight Service

Ninja Tables Pro Installation And Setting
CSS Hero Plugin Installation And Setting
Divi Theme Installation & Settings
Build Complete eCommerce Site

Quicklink

Home
Services
Contact
Blog

Copyright © 2022 ยท Designed by SM Creative Studio | Hosted by Cloudways DMCA.com Protection Status

  • Privacy Policy
  • Terms of Use