Are you looking for How to force SSL on your website? After installing SSL, your website enables you to surf with HTTPS. But, by default, when someone visits your website, it redirects HTTP, not HTTPS. Do not worry because it does not harm your website.
But how can you fix it by forcing HTTPS on your website to make it more secure and trusted?
Table of Contents
How to Force SSL?
Here is a simple tutorial you can follow.
Before we start, I want to tell you that this tutorial only works on the Apache server type. Not the Nginx server type. Not sure if your server is running Apache or Nginx? Look at the tutorial on how to check Apache or Nginx run on the server.
Step 1: Login cPanel/FTP Client
First of all, please log in to your cPanel. You can use the FTP client if your server does not provide cPanel. For the tutorial cPanel or FTP client, you can look at how to use cPanel and how to use FTP client, respectively.
But in this case, I will use cPanel.
Step 2: Open.Htaccess
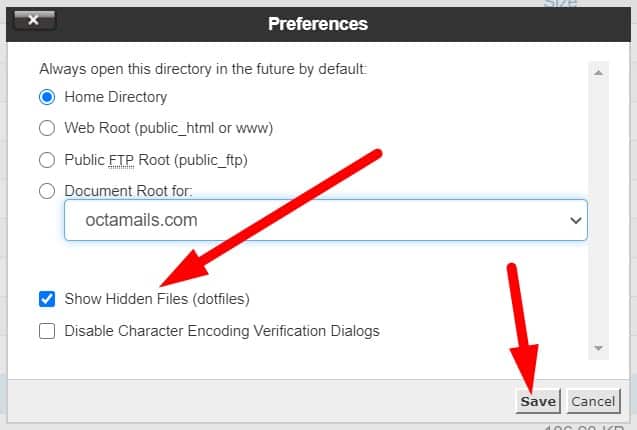
After logging in to cPanel, go to your root installation WordPress file and find the file .htaccess. If you can’t locate it, maybe your cPanel hides it.
To unhide, go to settings, tick "Show Hidden Files (dotfiles)," and then click save. If you still don't find it, create a new one. No problem.
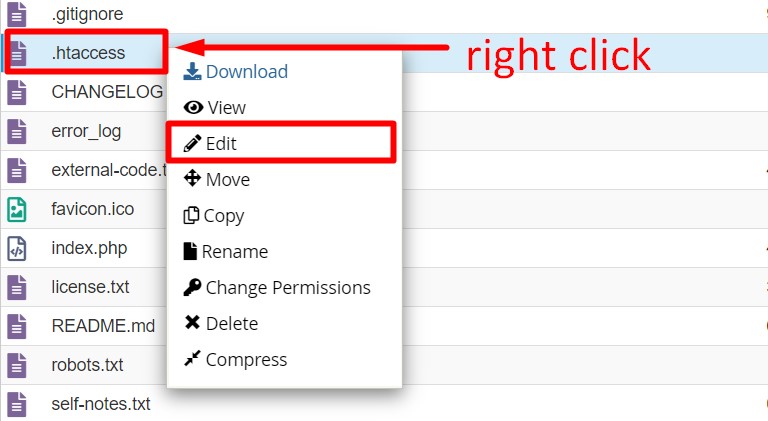
When you have a .htaccess file, ensure it is in editor mode because we will add some code here.
To turn it on to editor mode, right-click the .htaccess file, such as the image below.
Note: The "Setting" I have mentioned above (step 2) is located at the top right on your cPanel. If you still have a problem just drop a comment below.
Step 3: Copy & Paste Code
Here, I will separate it into several parts for specific redirection. You can choose which one you need because these codes redirect you differently.
Please copy and paste one of the codes below (.htaccess). When done, click Save Change to save what you edited just now.
» Forcing HTTPS on All Incoming URL
The best method to force HTTPS on all incoming URLs via .htaccess is using 301 redirects, which permanently redirects an old URL to a new one.
If you wish, use this code to paste it into .htaccess.
Make sure RewriteEngine On does not repeat write on the .htaccess file. Keep just one only.
Usually, you need this code.
» Forcing HTTPS on a Specific Domain
This is for exceptional cases, and not many use this.
Let’s say that you have two domains: http://domain1.com and http://domain2.com. Both domains access the same website, but you only want the first one to be redirected to the HTTPS URL. So, you need to use the following code:
Replace domain1.com with your desired domain, trying to force HTTPS on.
» Forcing HTTPS on a Specific Folder
If you wish to force HTTPS on the specific folder for your website, you can do it, too. However, the file should be placed in the folder that will have the HTTPS connection.
So, use this code to paste on .htaccess.
Make sure to change the folder references to the actual directory names.
Now, you have set SSL force redirect to your domain.
After making these changes, I recommend that you clear cookies and cache on the browser to give you the best experience when you try it.
If you still have a problem with redirection to SSL, please drop your comment below.
I will reply to it as soon as possible.
Conclusion
This tutorial shows you how to force SSL on your website. So, when someone visits your website, it will be redirected to a secure page, HTTPS. As I told you, this tutorial only works if your server uses Apache.
Note: We have upgraded this tutorial on the topic of how to redirect HTTP to HTTPS.
FAQ
What is HTTPS, and why is it important?
HTTPS (HyperText Transfer Protocol Secure) is a secure version of HTTP. It encrypts the data exchanged between your website and visitors, protecting sensitive information like passwords, credit card numbers, and personal details. HTTPS is also essential for improving SEO rankings and building user trust.
What does "forcing SSL" mean?
Forcing SSL means ensuring all visitors access your website over a secure HTTPS connection instead of an insecure HTTP. If someone tries to access your site via HTTP, they will automatically be redirected to the HTTPS version.
Why should I force HTTPS on my website?
Forcing HTTPS:
- Enhances website security.
- Builds user trust by showing a secure padlock in the browser.
- Complies with industry standards and regulations (e.g., GDPR, PCI DSS).
- Boosts search engine rankings (Google prioritizes HTTPS sites).
Can I force HTTPS without technical knowledge?
Yes, many hosting providers offer one-click SSL installation and automatic HTTPS redirection. CMS platforms like WordPress also have plugins (e.g., Really Simple SSL) that simplify the process.
Will forcing HTTPS affect my website's SEO?
Switching to HTTPS can positively affect your SEO. Google considers HTTPS a ranking factor. However, ensure proper 301 redirects from HTTP to HTTPS to preserve your current rankings.
What should I do if HTTPS breaks my site?
If enabling HTTPS causes issues (e.g., mixed content warnings):
- Check for HTTP links in your code and update them to HTTPS.
- Use tools like WhyNoPadlock or your browser's developer console to identify insecure elements.
- Contact your hosting support or developer for assistance.
What is a mixed content warning, and how do I fix it?
Mixed content warnings occur when your site loads some resources (e.g., images, scripts) over HTTP while the page itself is served over HTTPS. To fix it:
- Update all resource URLs to HTTPS.
- Use a plugin or script to rewrite insecure URLs automatically.
What tools can I use to test HTTPS implementation?
SSL Labs: Test your SSL configuration.
WhyNoPadlock: Identify mixed content issues.
Browser developer tools: Inspect network requests for HTTP links.
Do I need to renew my SSL certificate?
Yes, SSL certificates have expiration dates. Free certificates like Let’s Encrypt typically last 90 days but can often be auto-renewed. Paid certificates may last for a year or more.
Can I force HTTPS on subdomains?
Yes, you can. Use a wildcard SSL certificate to secure all subdomains or configure HTTPS for each subdomain.