How To Create PayPal Button Without Login Account? PayPal is the most popular payment gateway in the world because it is one of the first payment systems accepting to transfer and receive money worldwide since 1998.
Now PayPal has a variety of exciting features to make it easier for users to receive and transfer their money such as invoice generator, generate button for pay, generate button for subscribing, and many more.
Even there are many payment gateways out there, PayPal is still relevant and easiest to use. Sometimes, it designs more to friendly users and they know what users need from their services.
Before we go to the main topic, here I want to list the advantages and disadvantages of PayPal. So, you can decide if PayPal is suitable for your business or not.
Advantages PayPal
Let us look what the benefits or advantages if you use PayPal as your payment gateway to receive money from your customer.
- Customer feel safe to transfer their money
- Your customer’s money will protected by PayPal
- No worries about fraudlent
- Pay any where as long as you have internet connection
- Keeping to track transactions
- Can integrate almost website and app
- Free to create account for both (buyer & seller)
Disadvantages PayPal
Everything has its advantages and disadvantages. As well as PayPal has its own set of disadvantages. Here are the disadvantages of PayPal you need to know.
- Expensive fee/Hidden fee (PayPal fee)
- Strict rules that you need to follow them 100%
- Bad customer service
- Painful verification process
- Win for customer, bad for seller
But, in my opinion, and based on my experience with PayPal, there are not many problems. Like I said before, everything has its own advantages and disadvantages. So, if you want to use PayPal, you need to use it wisely.
Create PayPal Button Without Log In to Account
Now we go to the main topic.
If you are a web developer or web designer, sometimes you need to log in to your customer’s PayPal account to create a payment button as a payment gateway.
Right?
This stuff is very annoyed for some customers because the PayPal account is a very sensitive case. Are you willing to ask for PayPal login info from your customers?
What do you feel when someone requests to log in to your bank account?
That is how your client will feel.
Now, in this tutorial, I will show you how to create a PayPal button without login into your customer’s PayPal account.
Before I forget, this button creator is just for a primary button. For example, you can set for this:
- Types of button
- Item name
- Item id
- Price
- Currency
- Customize button
- Shipping
- Tax rate
- Email address to receive payments
For advanced settings like Track inventory, profit & loss there is no way to do it in this tutorial. You need to log in to your PayPal account to make this advanced setting.
Let’s begin!
Step 1 You need to go to the creator page button.
Step 2 Now you will direct to the creator page button such as below
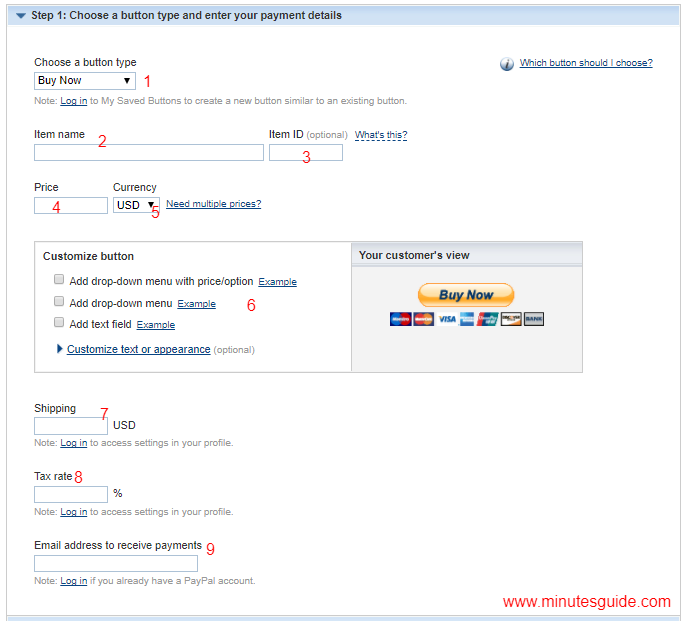
The explanation below is based on the number in the picture above.
Number 1 – Choose your button type. There are six types of buttons are:
- Shopping Cart
- Buy Now
- Donation
- Subscription
- Automatic Billing
- Installment Plan
Number 2 – Put a name for your goods or service.
Number 3 – Put your item ID if needed.
Number 4 – Put your fixed price.
Number 5 – Choose your currency option.
Number 6 – You can customize your PayPal button here.
Number 7 – You can put fix shipping rate here.
Number 8 – Put your tax if needed.
Number 9 – Put your email address to receive payment.
After that, please click on the “Create Button” on the bottom to finish it.
Now you will redirect to this page.

There is two option you can put this button on your website. Here is the explanation.
Number 1 – If you want to use HTML code, you can copy this code and paste it into your website.
Number 2 – If you want just a single link, you can click on this tab. Use it as a link to paste on Whatsapp, Facebook, email, and other platforms.
When they click on the button, they can make the purchase what you have done setting above.
It is easy, right?
Create PayPal Button When Log In to Account
As a bonus, here I will show you how to create a PayPal payment button when you log on to your PayPal account.
When you create button during login to account, you have additional features can add function on your button like track inventory, profit & loss, customer can change quantity, add special message and others.
So, let we look how to create button when you login to your PayPal account.
Step 1 Log in to your PayPal account.
Step 2 Go to buttons Paypal page.
Step 3 This is three step you need to configure to create your PayPal button.

If you logout your PayPal account, you can setting for step 1 only. But, if you login your PayPal account, you can setup more advance like at Step 2 and Step 3.
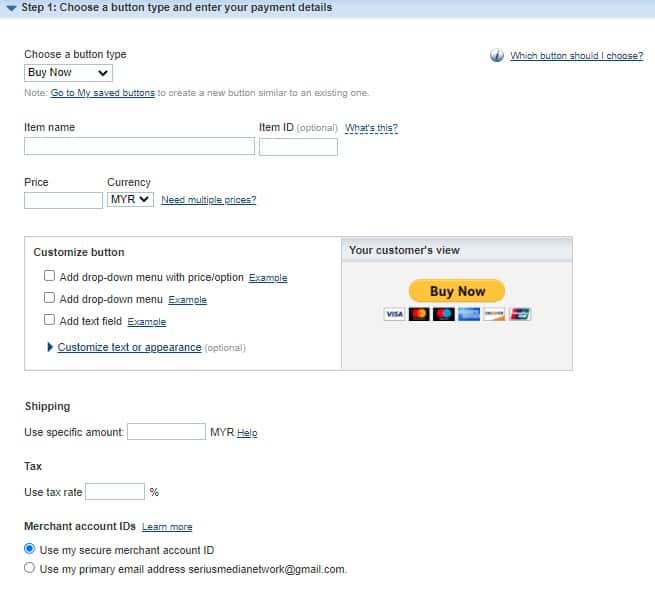
Step 4 For step 1 in PayPal button setting, you will look this setting. Please decide yourself. This setting it same when you not login to your PayPal Account.
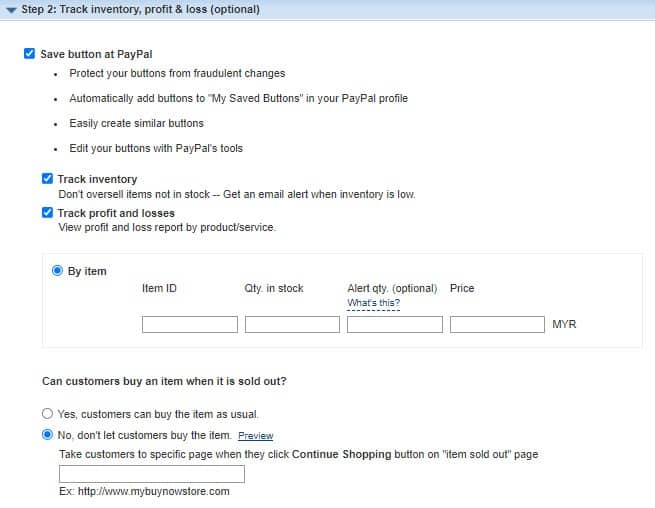
Step 5 For step 2 in PayPal button setting, you will look this setting. Please decide yourself. It is optional but if you want to more advance, please use this.
Step 6 For step 3 in PayPal button setting, you will look this setting. Please decide yourself. This step is optional too. But, if you look the settings, it will make buyer more interest to buy your product.
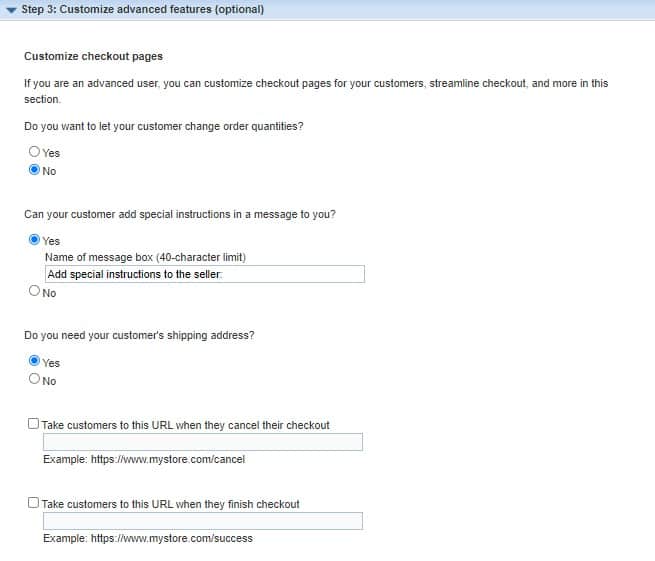
When you finish setting here, just click on the “Create Button”.
Done!
Conclusion
In this tutorial, you have learned how to create a PayPal button without logging into the PayPal account. This way can help you when you want to help someone build a PayPal payment button.
FAQ
Is PayPal free for registration?
Yes. PayPal is free to use but there is a fee you will be charged.
How to create PayPal button for payment?
Please follow my complete guide above.
What type of button PayPal have?
PayPal have Smart Buttons, Buy Now, Add to Cart, Smart Subscribe and Subscribe. Each of this button have a different role. So, you need to decide by yourself which one is more suitable for you.
If you like this article, then please FOLLOW our Linkedin, Twitter, YouTube, Pinterest, and Facebook. Do not forget to check our services page to upgrade your WordPress. If you find this post has an issue with copyright, outdated, or in error, please contact us to fix it.

Who would have thought of this? Nice article.
Thanks Emmaline for comment on this blog 🙂
Very interesting info!Perfect just what I was looking for!
thanks for comment in this blog