• Skip to primary navigation
  • Skip to main content
  • Skip to primary sidebar
  • Skip to footer
MinutesGuide.com

MinutesGuide.com

It is Not Just About WordPress

  • Home
  • About
  • Blog
    • Blogger Talk
    • Email Marketing
    • Hosting Talk
    • Plugins
    • Themes
      • Extra & Divi
    • WPbeginner
      • Guide
      • Life Hacks
      • WP Fix
    • WP Security
    • WP SEO
    • WooCommerce
  • Services
  • Reference
  • Contact
  • Start Here
Home » Blog » WooCommerce » How to add Custom Field in Woo…

How to add Custom Field in WooCommerce Checkout Page

Post on November 21, 2017 | Updated on November 30, 2020 by FaizAlias Leave a Comment

How to add Custom Field in WooCommerce Checkout Page | By default, WooCommerce does not have a function for you to make custom field in the checkout page. However, WooCommerce allows you to add this function with some trick either you use a coding or plugin.

Sometimes, you no need several fields which have provided by WooCommerce. For example a Company name maybe it not useful for your customer and you want to change this to another field. Yes, you can. So, how?

Add Custom Field in WooCommerce Checkout Page

Today, I will show you three ways how you can add this function into your WooCommerce site.

Method #1 Use Extension From WooCommerce

Yes. For your information, this is a way how WooCommerce makes money. They deliberately not add custom field function in the Checkout page, so you must buy their extension to get this special function.

It does not matter. This way is how they make money and grow their business.

If you like to get this function, just go to their product Checkout Field Editor and pay for several bucks.

Method #2 Use Third-Party Plugin

If you are not ready to use the extension from WooCommerce, you have more budget with WooCommerce Checkout Manager.

Yes, it is free! But it has the limit function. I think, although it has a limit function, it already enough what you need. Just try it and install this plugin on your site.

Method #3 Use Coding

If you want to use coding, first and foremost you must create a child theme. So, if you update your theme for the next version, your coding will not lose.

Let’s start. Copy the code below, and paste into your functions.php

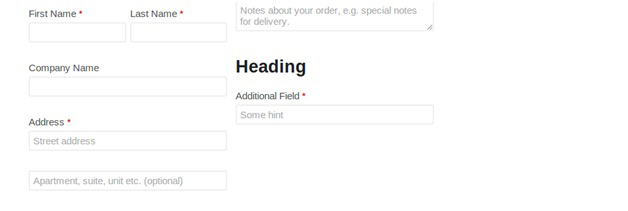
Then, you will see at checkout page like this.

After that, add the code below. This code is used for data validation of the custom field.

For the customer’s additional information be saved, add the code below.

Conclusion

In this tutorial, you have learned how to add or remove a custom field in WooCommerce checkout page. If you have any confusion, please leave us a comment below.

If you like this article, then please FOLLOW our Linkedin, Twitter, YouTube, Pinterest, and Facebook. Do not forget to check our services page to upgrade your WordPress. If you find this post has an issue with copyright, outdated, or in error, please contact us to fix it.

Related Article..

  • Unpaid Order Cancelled – Time Limit Reached
  • Change Text “Returning Customer?” Message on WooCommerce Checkout
  • How to Put Logo in WooCommerce Email Template
  • How to Remove Billing Address in WooCommerce (Easy Step)
  • How to Change Order Status Automatically in WooCommerce?

Filed Under: WooCommerce

Reader Interactions

Leave a Reply Cancel reply

Your email address will not be published. Required fields are marked *

Primary Sidebar

Follow Me

  • Facebook
  • GitHub
  • LinkedIn
  • Pinterest
  • Twitter
  • YouTube

Start With…

Start Blogging
blank
eShop Guide
blank
WP Guide
blank
WP Security

Categories

blank

Footer

About MinutesGuide

Was founded in October 2017 by FaizAlias. The main goal of this site is to provide quality tips, tricks, hacks in easy way that you can learn it just in minutes.

Highlight Service

Ninja Tables Pro Installation And Setting
CSS Hero Plugin Installation And Setting
Divi Theme Installation & Settings
Build Complete eCommerce Site

Quicklink

Home
Services
Contact
Blog

Copyright © 2021 · Designed by SM Creative Studio | Hosted by Cloudways DMCA.com Protection Status

  • Privacy Policy
  • Terms of Use