
Email marketing remains an important marketing strategy for businesses, website owners, affiliate marketers, and online entrepreneurs. Even with the growth of social media and other digital marketing channels, email marketing continues to be an effective way to communicate directly with customers and prospects.
Many email marketing platforms provide ready-to-use services, but their monthly costs can become expensive, especially when you have a large number of subscribers or need to send a high volume of emails.
One alternative is to use self-hosted email marketing software such as MailWizz. With MailWizz, you can install the software on your own server and manage your email marketing system yourself.
However, installing MailWizz on a VPS requires several steps. You need to prepare the server, create a database, upload the MailWizz files, complete the web-based installation, configure the required cron jobs, and remove the installation directory after the installation has been completed.
In this guide, I will explain how to install MailWizz on VPS step by step. The instructions are written for beginners, so you can follow the process even if you are not very familiar with server administration.
Table of Contents
How to Install MailWizz On VPS?

What Is MailWizz?
Before learning how to install MailWizz on VPS, it is useful to understand what MailWizz actually is.
MailWizz is self-hosted email marketing software that you can install on your own web server or VPS. It allows you to manage email lists, subscribers, campaigns, delivery servers, and other email marketing activities from your own installation.
Unlike a hosted email marketing service, where the software is operated entirely by the provider, MailWizz gives you more control over your installation and data.
You can manage your email lists, create campaigns, configure delivery servers, and control the application from its administration panel.
MailWizz is similar in purpose to popular email marketing platforms such as AWeber and GetResponse, but the major difference is that you host the MailWizz application yourself.
This can be useful if you want more control over your email marketing infrastructure and do not want to depend entirely on a monthly subscription service.
However, using a self-hosted email marketing application also means that you are responsible for your server configuration, email delivery setup, security, backups, and sender reputation.
What Do You Need Before Installing MailWizz?
Before you begin the installation, make sure you have the necessary resources ready.
You will need:
- A VPS server.
- A domain name or subdomain.
- A valid MailWizz license and installation package.
- A web server such as Apache or Nginx.
- PHP 8.2 or newer.
- MySQL or MariaDB with InnoDB support.
- Linux cron job access.
- The required PHP extensions, including GD, ZIP, mbstring, and cURL.
- Access to your server control panel or SSH.
- An SSL certificate for your domain.
MailWizz's official documentation currently recommends a properly configured VPS for running the application. The MailWizz installer will also check the server environment and tell you if any required components are missing.
If you are using cPanel, the installation process can be easier because you can manage your database, files, and cron jobs through a graphical interface.
How to Install MailWizz On VPS
Now let's start the installation process.
The following steps follow the same basic installation approach as the original guide, but the instructions have been expanded to make them easier for beginners to understand.
Step 1: Log In to Your VPS or cPanel
First, log in to your VPS server or its control panel.
In the original guide, cPanel is used because it makes many server management tasks easier. If your VPS provider gives you cPanel, you can use it to manage your files, databases, domains, and cron jobs without performing every task from the command line.
If you are using a VPS without cPanel, you can still install MailWizz. However, you may need to perform some tasks through SSH and configure your web server manually.
Before proceeding, make sure your domain is already pointing to the IP address of your VPS.
For example, if your domain is:
example.com
the domain's DNS records should point to your VPS server.
You should also configure HTTPS before using MailWizz for production email marketing.
Step 2: Create a Database
The next step is to create a database for MailWizz.
If you are using cPanel, open the MySQL Databases section and create a new database.
You normally need three pieces of information:
- Database name
- Database username
- Database password
For example:
Database Name: mailwizz_db
Database Username: mailwizz_user
Database Password: use-a-strong-password
The actual names will depend on your hosting environment.
Make sure you save these details somewhere secure because you will need them during the MailWizz installation process.
It is also important to give the database user the appropriate privileges for the MailWizz database. If the database user does not have sufficient permissions, the installer may not be able to create or modify the required database tables.
Step 3: Upload the MailWizz Files
After creating the database, you need to upload the MailWizz application files to your VPS.
When you download the MailWizz installation package, extract the archive on your computer.
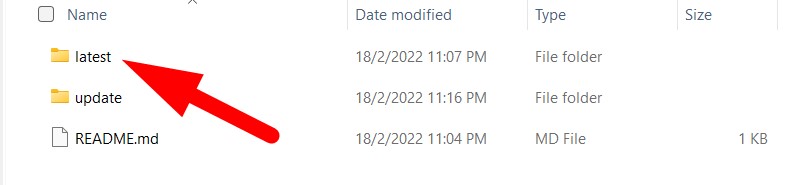
Inside the extracted files, you should find a folder called: latest
MailWizz's official installation instructions explain that the contents of the latest folder should be uploaded to the document root of your website.
For example, if your domain is using the standard cPanel document root, the location may look similar to:
/home/username/public_html/
If you are installing MailWizz in a separate directory, you may instead use something like:
/home/username/public_html/mailer/
The exact location depends on how you have configured your domain.
You can upload the files using several methods.
For example, you can use:
- cPanel File Manager
- FTP
- SFTP
- WinSCP
- SSH and command-line tools
If you are a beginner, cPanel File Manager or an FTP/SFTP application may be easier.
Make sure you upload the contents of the latest folder rather than accidentally creating an unnecessary additional latest directory inside your website's document root.
Step 4: Open the MailWizz Installation Page
After uploading all the files, open your web browser.
Enter the MailWizz installation URL in your browser.
The basic URL structure is:
For example, if your domain is:
example.com
you would normally visit:
MailWizz's official installation documentation also uses the /install/index.php installation path.
If the files were uploaded correctly and your domain is configured properly, you should see the MailWizz installation page.
If you receive a 404 error or another server error, check whether the files were uploaded to the correct document root and whether your domain is pointing to the correct VPS.
Step 5: Enter Your License and Installation Information
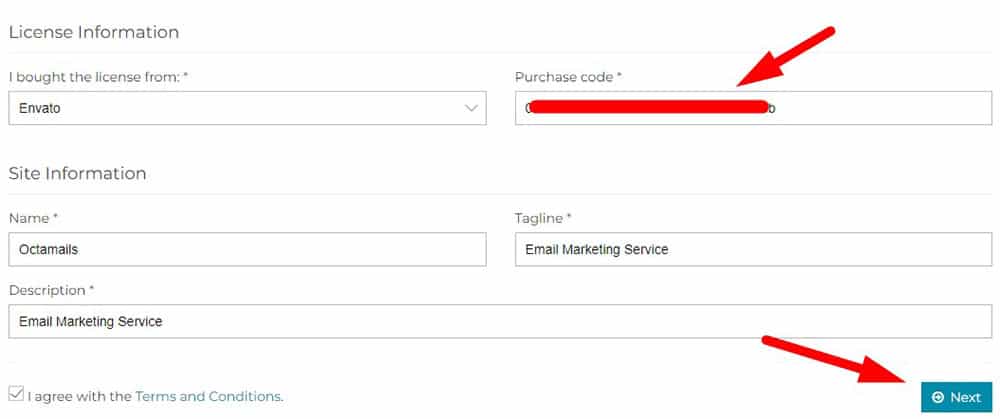
The MailWizz installer will ask you to provide the information required to continue the installation.
Fill in the required fields carefully.
You should use a valid MailWizz license because the application requires valid license information during installation. MailWizz associates the license information with the server environment where the application is installed.
After entering the required information, click the Next button.
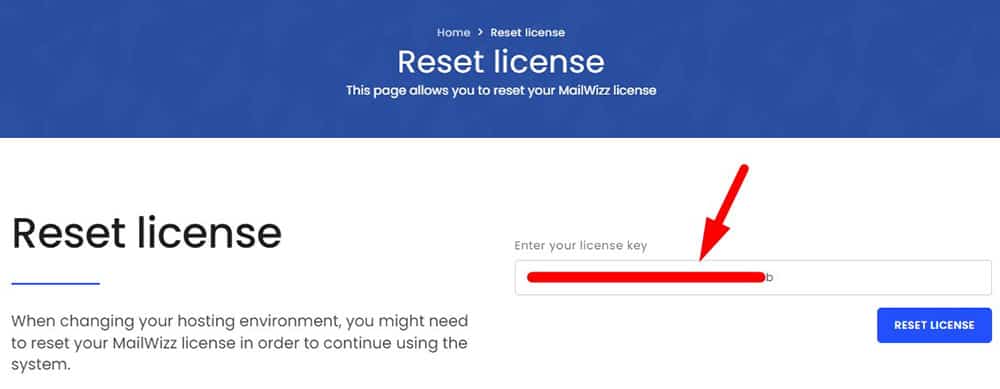
If you previously installed MailWizz on another server or moved an existing installation to a different hosting environment, you may need to reset or update your license information before installing it on the new server.
MailWizz provides an official license reset page for this purpose.
This is particularly important if you see a message indicating that the license is already registered to another MailWizz instance. According to MailWizz's documentation, this can happen when the license is associated with a different hosting environment.
Step 6: Check the Server Requirements
The next step is the server requirements check.
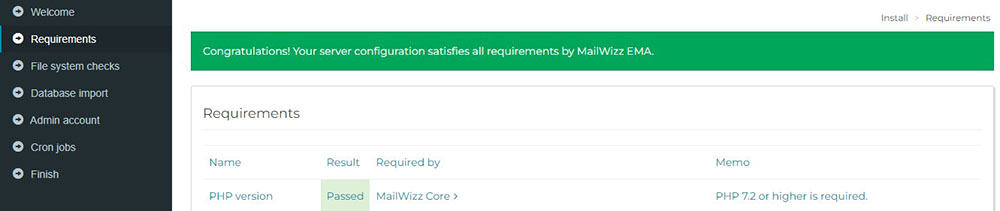
MailWizz will examine your server configuration to determine whether the necessary software, PHP version, PHP extensions, and other requirements are available.
This step is important because MailWizz cannot operate correctly if required server components are missing or incorrectly configured.
Current MailWizz requirements include:
- Linux operating system
- Apache or Nginx
- PHP 8.2 or newer
- MySQL or MariaDB with InnoDB
- Linux cron access
- GD
- ZIP
- mbstring
- cURL
These requirements are listed in the current MailWizz documentation.
If all requirements are satisfied, the installer should indicate that the server environment has passed the checks.
If you see an error or warning, do not simply continue without understanding the problem.
For example, if the installer tells you that a PHP extension is missing, you should install or enable the required extension through your server configuration.
If you are using managed hosting or cPanel, you can contact your hosting provider if you are unsure how to resolve the requirement.
Once everything is ready, scroll down and click the Next button.
Step 7: Check the File System Permissions

The next stage checks whether MailWizz has permission to write to the directories it needs.
File permissions are important because MailWizz needs to create files, store temporary data, maintain cache files, and perform other application tasks.
If the installer reports that a directory is not writable, you need to correct the permissions or ownership before continuing.
The original version of this tutorial instructed users to change directories to 0777. However, you should avoid applying overly permissive permissions to your entire application unnecessarily.
Use the permissions recommended by your current MailWizz version and server configuration, and make sure the web server user has the required write access.
MailWizz's current documentation identifies several directories that need to be writable in certain server operations and also provides a set-dir-perms script for setting the required permissions.
If the installation page displays a green or successful status for the required file system checks, you can continue.
Click the Next button.
Step 8: Enter the Database Information
You will now need to enter the database information you created earlier.
Enter:
- Database server or host
- Database port
- Database name
- Database username
- Database password
For a standard local MySQL or MariaDB installation, the database host is commonly localhost, although this depends on your server configuration.
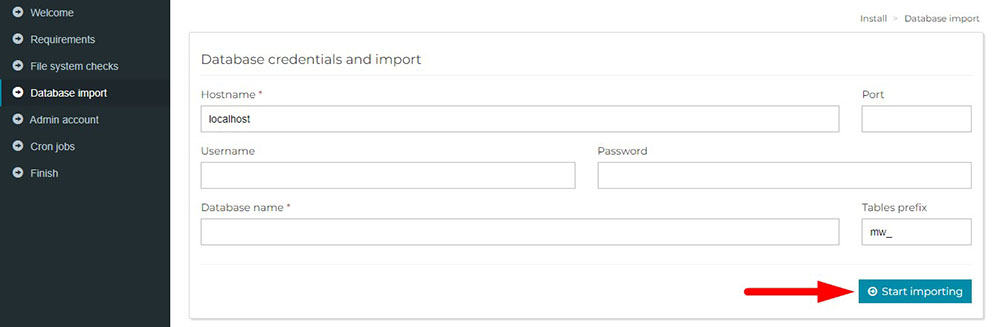
If the installer asks for a database port and your server uses the standard configuration, you can normally leave it blank or use the value expected by the installer.
Double-check the database name, username, and password before continuing.
A small mistake in any of these fields can prevent MailWizz from connecting to the database.
After entering the database information, click the Start Importing button.
MailWizz will then create and import the required database structure.
The amount of time required for this process depends on your server's performance and the size of the installation.
Do not close the browser while the database import is in progress.
Step 9: Create the MailWizz Administrator Account
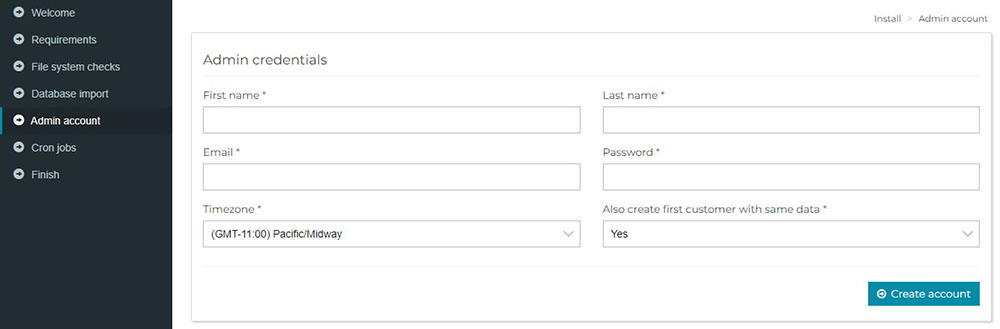
After the database import has finished, MailWizz will move to the administrator account configuration.
At this stage, you need to create your MailWizz administrator login credentials.
You will generally need to provide information such as:
- Administrator email address
- Username
- Password
- Other administrator information requested by the installer
Choose a strong and unique password for your administrator account.
Do not use an easily guessed password such as your domain name, business name, birthday, or a simple combination of numbers.
Your MailWizz administrator account provides access to important settings, including email delivery configuration, user management, campaigns, lists, and other system settings.
After completing the required fields, continue to the next step.
Step 10: Configure the MailWizz Cron Jobs
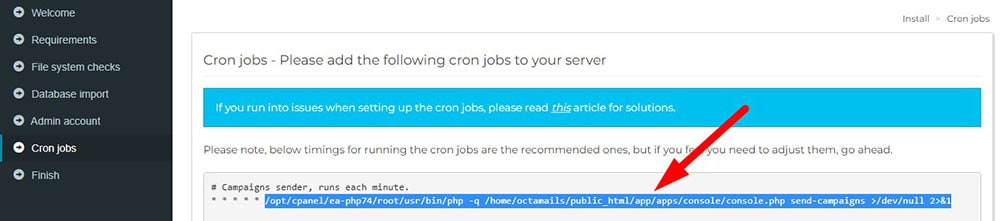
This is one of the most important steps in the entire MailWizz installation process.
MailWizz uses Linux cron jobs to perform automated tasks in the background.
These tasks can include sending campaigns, processing transactional emails, handling bounces, processing feedback loops, processing delivery logs, and performing scheduled maintenance.
Without properly configured cron jobs, important MailWizz functions may not work correctly. MailWizz specifically recommends setting up the required cron jobs after installation.
The MailWizz installation process provides a list of cron jobs that need to be added to your server.
If you are using cPanel, open the Cron Jobs section and add the commands provided by MailWizz.
The exact commands can vary depending on your MailWizz version and the location of your installation.
For current MailWizz versions, the official documentation provides commands similar to the following:
* * * * * php -q {FULL_PATH_TO_APPS_FOLDER}/apps/console/console.php send-campaigns > /dev/null 2>&1

*/2 * * * * php -q {FULL_PATH_TO_APPS_FOLDER}/apps/console/console.php send-transactional-emails > /dev/null 2>&1

*/10 * * * * php -q {FULL_PATH_TO_APPS_FOLDER}/apps/console/console.php bounce-handler > /dev/null 2>&1

*/20 * * * * php -q {FULL_PATH_TO_APPS_FOLDER}/apps/console/console.php feedback-loop-handler > /dev/null 2>&1

*/3 * * * * php -q {FULL_PATH_TO_APPS_FOLDER}/apps/console/console.php process-delivery-and-bounce-log > /dev/null 2>&1

0 * * * * php -q {FULL_PATH_TO_APPS_FOLDER}/apps/console/console.php hourly > /dev/null 2>&1

0 0 * * * php -q {FULL_PATH_TO_APPS_FOLDER}/apps/console/console.php daily > /dev/null 2>&1
These are examples based on the current MailWizz documentation. You should always use the cron commands displayed by your own MailWizz installation because the required commands can depend on your installed version and server path.
For example, if your MailWizz files are located at:
/home/username/public_html/
you need to replace {FULL_PATH_TO_APPS_FOLDER} with the actual path to your installation.
If you are not familiar with cron jobs, do not guess the commands.
You can use cPanel's Cron Jobs interface if it is available on your server, or use the command line with crontab -e.
MailWizz also provides the cron job list inside the application under:
Backend > Miscellaneous > Cron Jobs List
This is useful because it allows you to check the cron commands required by your installation.
Once all required cron jobs have been added, return to the MailWizz installer and continue.

Step 11: Complete the Installation
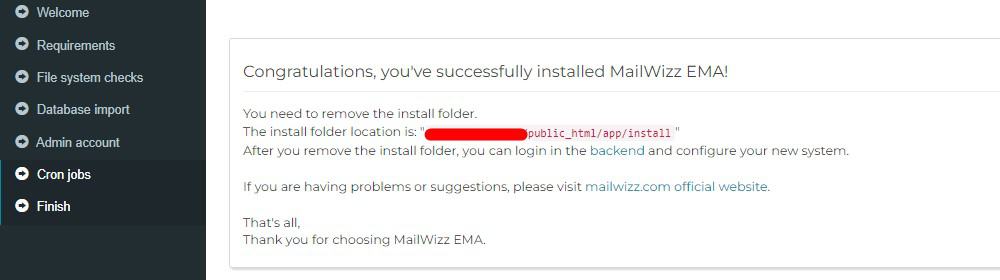
If all previous steps have been completed successfully, MailWizz should display a successful installation message.
Congratulations!
Your MailWizz installation is now ready.
However, there is one important security step that you should complete immediately.
Step 12: Delete the Install Folder
After successfully installing MailWizz, remove the install folder from your server.
This is an important security measure.
MailWizz's official installation documentation specifically instructs users to remove the installation folder after completing the installation.
If you are using cPanel, you can remove the folder through File Manager.
For example, if MailWizz is installed in your website's document root, look for:
public_html/install
Delete the install directory after confirming that the installation has completed successfully.
Do not delete other MailWizz directories unless you know exactly what they are used for.
After removing the installation directory, you can access the MailWizz administration area.
The standard backend URL is:
MailWizz's official installation documentation also identifies /backend as the location to access the application after installation.
What Should You Do After Installing MailWizz?
Installing MailWizz is only the beginning.
Before sending an actual email campaign, you still need to configure the application properly.
According to the official MailWizz getting-started documentation, administrators should configure cron jobs, add delivery servers, configure bounce servers, configure feedback loop servers, and verify the delivery settings.
Your next steps should include:
- Confirm that all cron jobs are running.
- Configure your delivery server.
- Configure your bounce server.
- Configure your feedback loop settings where applicable.
- Configure SPF, DKIM, and DMARC for your sending domain.
- Verify your domain and email authentication settings.
- Test email delivery before sending a large campaign.
- Monitor your delivery and bounce logs.
- Configure regular server and database backups.
- Keep your VPS and MailWizz installation updated.
These steps are important because installing the application alone does not guarantee good email delivery.
Your email sending reputation also depends on factors such as your sending domain, IP reputation, authentication records, recipient engagement, bounce rates, spam complaints, and the quality of your email lists.
Conclusion
Installing MailWizz on a VPS may seem complicated at first, especially if you are new to server management. However, the process becomes much easier when you divide it into smaller steps.
First, prepare your VPS and domain. Then create the MailWizz database, upload the application files, open the installation page, complete the server requirement checks, configure the database, create your administrator account, and add the required cron jobs.
After the installation has been completed, remember to remove the install folder from your server.
The most important thing to remember is that installing MailWizz does not automatically mean your email marketing system is ready to send campaigns. You still need to configure your delivery servers, email authentication, bounce processing, feedback loops, cron jobs, and other sending settings.
Once these configurations are properly completed and tested, you can start using MailWizz to manage your email lists and campaigns from your own VPS.
Frequently Asked Questions About Installing MailWizz on VPS
Can I install MailWizz on any VPS?
MailWizz can be installed on a VPS as long as the server meets its system requirements. You generally need a Linux-based server, a supported web server such as Apache or Nginx, PHP 8.2 or newer, MySQL or MariaDB with InnoDB support, the required PHP extensions, and access to Linux cron jobs.
Do I need technical knowledge to install MailWizz on a VPS?
Some basic knowledge of web hosting, databases, domains, and server management is helpful. However, beginners can install MailWizz by following the installation process carefully. If your VPS includes cPanel, tasks such as creating databases, uploading files, and configuring cron jobs can be easier.
What PHP version does MailWizz require?
Current MailWizz requirements specify PHP 8.2 or newer. You should check the requirements for your specific MailWizz version before starting the installation because requirements can change between releases.
Do I need a domain name to install MailWizz?
It is strongly recommended to use a domain or subdomain for a production MailWizz installation. Your domain should point to the IP address of your VPS, and you should configure HTTPS before using the application for actual email campaigns.
Why are cron jobs important in MailWizz?
Cron jobs allow MailWizz to perform scheduled and background tasks automatically. They are used for functions such as processing campaigns, sending transactional emails, handling bounces, processing delivery logs, and performing scheduled maintenance.
Without properly configured cron jobs, some MailWizz features may not work as expected.
Where can I find the MailWizz cron job commands?
After installation, you can find the required cron commands from the MailWizz administration area under Backend > Miscellaneous > Cron Jobs List. You should use the commands provided by your installed version rather than copying commands from an unrelated MailWizz installation.
Why does MailWizz show a file permission error?
A file permission error usually means that MailWizz cannot read, write, or execute a required file or directory. Check the permissions and ownership of the affected directories and follow the permission requirements provided by your MailWizz version.
Avoid giving unnecessary directories overly permissive 777 permissions.
Why can't MailWizz connect to my database?
This problem is usually caused by incorrect database credentials or an incorrect database host. Check your database name, username, password, host, and port. You should also make sure that the database user has sufficient privileges to access the MailWizz database.
Do I need an SSL certificate for MailWizz?
Yes, using HTTPS is strongly recommended, particularly for a production MailWizz installation. An SSL certificate encrypts communication between your browser and the server and helps protect administrator login credentials and other information.
Should I delete the MailWizz install folder after installation?
Yes. After successfully completing the installation, you should remove the install directory from your server. This is an important security step and is also part of MailWizz's official installation instructions.
Can I use MailWizz immediately after installing it?
You can access the MailWizz administration area after installation, but additional configuration is required before sending real email campaigns. You should configure your delivery server, bounce handling, email authentication, cron jobs, and other relevant settings first.
Do I need to configure SPF, DKIM, and DMARC?
Yes. SPF, DKIM, and DMARC are important email authentication mechanisms that should be configured for your sending domain. Proper authentication can help receiving mail servers verify that your emails are legitimately being sent from your domain.
Can I install MailWizz without cPanel?
Yes. cPanel is not required. MailWizz can be installed on a VPS using a web server such as Apache or Nginx and managed through SSH and other server administration tools. However, cPanel can make tasks such as database management and cron configuration easier for beginners.
Why is my MailWizz email going to spam?
Installing MailWizz correctly does not guarantee that emails will reach the inbox. Deliverability depends on several factors, including your domain and IP reputation, SPF/DKIM/DMARC configuration, email content, recipient engagement, bounce rates, spam complaints, and the quality of your mailing list.
You should properly configure your sending infrastructure and test email delivery before sending large campaigns.
Is a VPS suitable for sending large email campaigns with MailWizz?
A VPS can be suitable for MailWizz, but the appropriate server resources depend on factors such as the number of subscribers, campaign volume, sending speed, and the delivery infrastructure you use. Larger email operations may require more CPU, RAM, storage, and careful server configuration.
References
- Install Mailwizz On a Vps - forum.mailwizz.com
- How to Install MailWizz on Your VPS? - scalahosting.com/blog