How to Add Shadow to Image In WordPress Post Without Plugin | If you add an image to a WordPress post, the picture’s border is just plain by default. There is no border or shadow to show. Sometimes, it looks ugly, and I don’t know why I look messy without a border.
In addition, when we add a shadow to the picture, it will be more prominent and focused. So, I think adding shadow to the image is essential to get more attention from our readers.
So how?
I do not recommend using plugins here, even though you can use many free plugins.
Using the plugin in your WordPress will make your WordPress slow in loading, use CPU processors on your hosting, use more bandwidth, and more.

So here, I will tell you how you can make or add a shadow on the image on your WordPress without using any plugin. And the interesting point here is you do not need to update it forever. Using a plugin created by someone who no longer updates it will cause a problem for your WordPress.
How To Add Shadow To Image In DIVI Theme
In this tutorial, I use Extra Theme from Elegant Theme. It is the same as Divi Theme users. If you are not an Extra or Divi user, you can still follow my tutorial below, but it is slightly different.
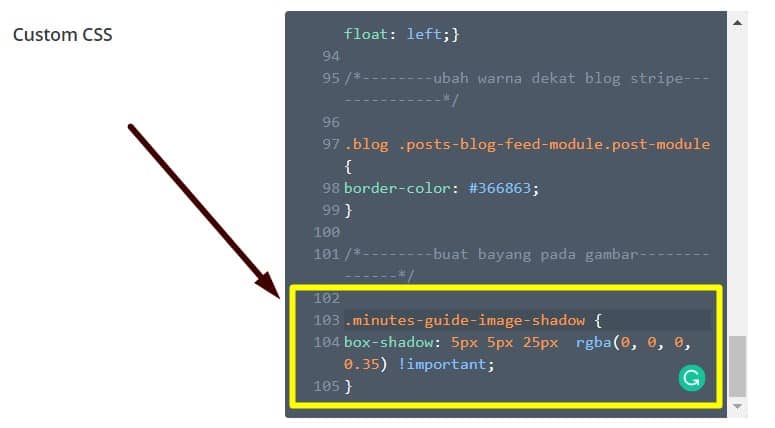
Step 1: Copy and paste the code below on custom CSS for the Extra theme.
.minutes-shadow {
box-shadow: 5px 5px 25px  rgba(0, 0, 0, 0.35) !important;
}
To find custom CSS for extra theme, you can go to;
Dashboard >>> Extra >>> Theme Option
and paste the code here.
It would look like this.
Then click save the setting.
Step 2: For example, upload your image to the post and click on the image. Look to the right on your screen, click on the block section, and click on the advance tab under the block section. Refer to the picture below.
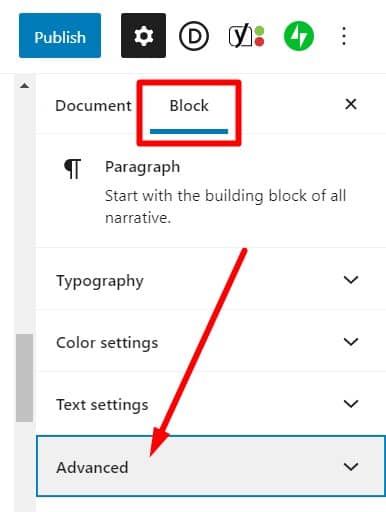
Step 3: After you click on the tab advance, it will show you two empty columns. HTML anchor and Additional CSS class(es). On the additional CSS class(es), put the code;
minutes-shadow
It is based on your CSS code as step 1 above. Please try to take the time to learn it. Quickly, you will understand why you should put the code “minutes-guide-image-shadow” on the additional CSS class column.

After that, you click update to save what you have changed.
That all.
And now, you should see a picture with a shadow at the border.
I hope this tutorial helps you a lot.
Thanks for stopping by here!
Conclusion
Adding image shadow on a WordPress post does not give any SEO effect or special effect, but if you want to make your post cleaner and more transparent, adding shadow to the image is essential.
FAQ
Can I use this trick on another Theme?
Yes, you can use this trick on another theme, WordPress. Maybe it differs from the step above, but it is still the same concept.
Can I change the shadow color?
Yes, you can change the shadow color by changing “rgba(0, 0, 0, 0.35)” with any color code from the code above.

0 Comments