Configuring the WordPress General Settings | After you finish install WordPress site on your hosting, the next thing you must to do is configuring the WordPress general settings. It is quite important to do it if you want to optimize your site to Google.
Where is general setting located?
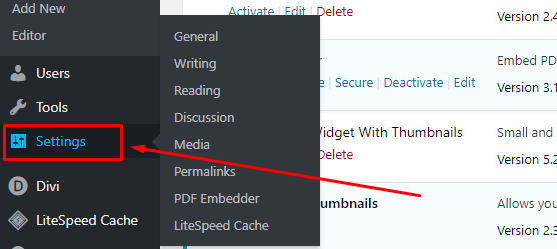
If you are not familiar with WordPress, general setting you can find it on the left menu dashboard. Settings. Just click on it.

By default, the general setting has six section. They are:
- General section
- Writing section
- Reading section
- Discussion section
- Media section
- Permalinks section
So, I will show you all this how to set it properly one by one.
Configuring the WordPress General Settings

So, let’s we start with General section
Section #1: General
Site Title – Choose your title site properly. Just write one until three words. This site title will show on the toolbar on the browser. Ex: Minutes Guide.
Tagline – For a tagline, write what your site is about? Just write a simple sentence but meaningful. This is good for your SEO site. Ex: Learn WordPress and Blogging in Minutes
WordPress Address (URL) – Write your full URL here during you install WordPress. Actually, here is auto write for you. Please do not change anything here unless you know what you do. If you use www, please put www and vice versa.
Site Address (URL) – Same as WordPress Address (URL). If your URL here is not same, you will get an error to access your website.
Email Address – Put your primary email address here. This address is used for admin purposes like new user notification, reset password reminder, comment notification and more.
Membership – If you allow the user to register an account on your site, check this box function. Otherwise, left it to default as uncheck. Usually, you use this when you want to make your website as a membership site.
New User Default Role – After user register on your site, what the default role you wish them in your site (administrator, editor, author, contributor, subscriber).
Site Language – Choose your primary language here. This language will apply to admin dashboard only. It does not affect on your content in post or page. For us, we comfortable to leave it to default as English.
Timezone – Choose your local time zone here. It purposes to indicate when your post or page publish.
Date and Time Format – Determine which date and time format you want.
Week Starts On – Which day you prefer to make as your weekends. Usually, many WordPress users left it by default.
Section #2: Writing
Default Post Category – Set your default post category. If you forgot to set category during you write an article, category you set here act as default in your post.
Post via email – Usually, all WordPress user leave here as default. Nothing you can do here.
Update Services – Here is additional function where after you publish a post, WordPress automatically notifies the site update services. So, here you can add the following site update services.
Default Post Format – Select you default post format. Usually, select the “Standard” option.
Section #3: Reading (cooming soon)
Conclusion
In this article, you have learned how to set up the general setting in WordPress properly. Many users ignore this setting after they install their WordPress.
If you like this article, then please FOLLOW our Linkedin, Twitter, YouTube, Pinterest, and Facebook. Do not forget to check our services page to upgrade your WordPress. If you find this post has an issue with copyright, outdated, or in error, please contact us to fix it.

Leave a Reply